


My Vocal Chain Using UAD Spark, FabFilter, Logic Pro, Valhalla and H-Delay

Vocals are usually one of the last things I mix in a track, but they’re often the first thing a listener connects with. You can have great drums, guitars, synths and production, but if the vocal doesn’t sit right, the whole mix will feel unfinished.

This is a breakdown of how I usually approach a vocal chain using UAD Spark, FabFilter, stock Logic Pro plugins, Valhalla VintageVerb and Waves H-Delay. This isn’t a fixed method or a “one chain works for everything” setup. Every singer, song and production needs something slightly different, but I hope this is good starting point with some useful advice.
Cleaning and Balancing Before Plugins
The most important part of my vocal chain actually happens before I start mixing. Before I think about compression, EQ, reverb or delay, I go through the raw vocal audio and clean it carefully. That means removing unwanted clicks, chair creaks, headphone noise, awkward sounds before and after takes, and anything else that distracts from the performance.
I’m careful with breaths. Some breaths are really important because they add emotion, realism and phrasing, especially in a more intimate performance. I don’t want to remove the life from the vocal. But if a breath is too loud, badly timed or distracting, I’ll either reduce it with clip gain or remove it completely.
If there’s a more constant issue, such as a high microphone noise floor or unwanted room tone, I’ll sometimes use RX Voice De-noise by iZotope. I’m still using RX 7 and haven’t felt a major need to upgrade yet. The newer versions look incredible, but for what I need, RX Voice De-noise has been doing a great job. The main thing is not to over-process. I only want to remove what is getting in the way of the performance.

Once the audio is clean, the next stage is balancing. I usually mix vocals last, so by this point the rest of the track should already be sitting roughly where I want it. Then I bring the vocal into my mix and work through the song section by section.
I’ll often split the vocal into different tracks for verse one, chorus one, verse two, bridge, final chorus and so on. If there are different singing styles, doubles, harmonies, call-and-response parts or more aggressive sections, I’ll usually separate those as well. A quiet verse vocal doesn’t need to be treated the same way as a big final chorus vocal, so splitting the sections gives me much more control.
For balancing, I use a combination of track gain and clip gain. I might split a phrase, word or breath into its own region and adjust the gain so it hits the processing in a more consistent way. I generally don’t like using automation too early, because if I come back the next day and change the main vocal level, I don’t want old automation pulling it back to where it was. If I need automated gain at this stage, I’ll usually automate a gain plugin instead, so the main fader still stays flexible.
The goal is simple: make the vocal sound as strong and controlled as possible before plugins. If the vocal already feels balanced before compression, you won’t have to over-compress it later.
Routing the Vocals
After cleaning and balancing, I’ll usually route similar vocal tracks into a summing stack. This keeps the session organised, reduces CPU load, and helps the vocal feel more consistent. It feels more like one complete performance rather than a collection of separate recordings.

Logic Pro Channel EQ
The first plugin I usually apply is the stock Logic Pro Channel EQ. At this point I’m usually doing two things: removing unwanted sound and shaping the vocal towards the tone the artist wants. The first move is normally a high-pass filter. In most vocals, there isn’t much useful information under 100Hz. That low area often contains plosives, room rumble, mic movement or low-end noise that doesn’t help the vocal sit in the track. I’ll listen carefully and move the high-pass filter until the vocal feels cleaner without effecting any of the actual vocal. Sometimes that might be below 100Hz, sometimes around 100Hz, and sometimes a little higher depending on the singer and arrangement.
After that, I’ll listen for low-mid build-up. A vocal can often feel cloudy or boxy around 200Hz to 400Hz, so I may gently pull that down with a low shelf. I’ll then look at the midrange and top end. Around 1.5kHz can change how forward or present the vocal feels, while a high shelf can add air and openness, or be pulled back if the vocal is already bright or harsh.
This is all subjective. The real question is: what does this vocal need to feel like? Airy and expensive? Dark and intimate? Forward and aggressive? Soft and mysterious? The emotional goal should decide the EQ moves, not just the frequency numbers.

FabFilter Pro-Q
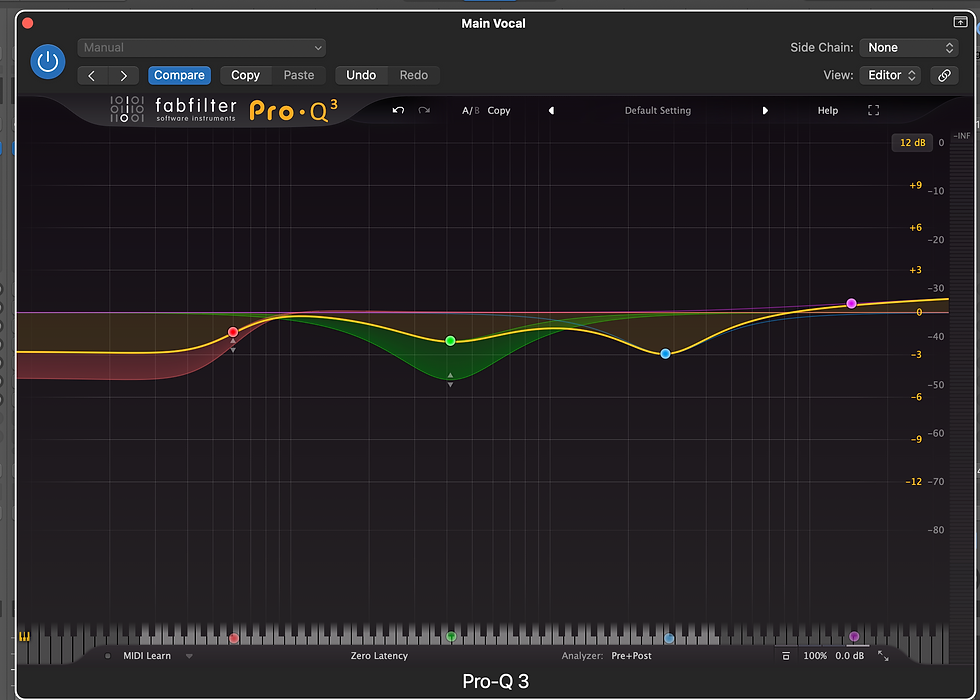
If there’s a problem area that only appears sometimes, I’ll usually reach for FabFilter Pro-Q 4. For example, if a vocalist has a boomy note that jumps out only on certain words, I don’t always want to cut that frequency for the entire performance. That can make the whole vocal thinner than it needs to be. Instead, I’ll use dynamic EQ to control that frequency only when it pushes forward. This is useful for low-mid build-up, harshness, nasal tones or specific resonances that appear on certain notes.
The Pro-Q 4 is great for this because it’s precise and easy to evaluate what’s happening. I’m not using it to completely redesign the vocal. I’m using it to control the small problem areas that stop the vocal feeling smooth and consistent.
UAD Neve 1073

After the corrective EQ stage, I often like to go into a Neve 1073 emulation. I use the UAD Spark version, and it sounds great to me. This is less about surgical correction and more about tone. Adding a little bit of gain through the 1073 can help bring the vocal forward in the mix. It can add warmth, clarity and a bit of analogue-style character without needing to do anything too extreme.
Sometimes I’ll use a small amount of the 1073’s EQ, I tend to keep this fairly subtle. I’ve already done the detailed clean-up with the Channel EQ and Pro-Q 4, so I don’t need the 1073 to fix the vocal. I want it to enhance the performance and make it feel slightly more finished.
Vocal Compression

On my main vocal summing stack, I’ll typically mix into an SSL G Series Bus Compressor by UAD. I’m not trying to crush the vocal here. This is usually gentle peak control and glue. I’ll often set a medium-fast attack, somewhere around 3ms to 10ms depending on the performance, and adjust the threshold so it’s only taking off around 2dB to 4dB on the louder peaks. This helps tidy the vocal and make it feel more controlled without making it sound overly compressed.
Most of the plugins in this chain are doing small jobs. I’d rather have a few stages gently shaping the sound than one compressor doing all the work.
After that, I may go into either an LA-2A compressor or an Avalon VT-737, depending on the vocal and the style of the track. The LA-2A gives me a warmer, richer and slightly more coloured sound. It has a musical smoothness that can work really well on vocals, especially when I want the performance to feel rounded and emotionally connected.
The Avalon gives me a slightly different kind of control. I can usually get more compression from it while still keeping the vocal sounding polished, and it also gives me some extra EQ options at the end of the chain. I wouldn’t really use both. It depends on the voice, the song and how much character I want the vocal to have.

If I want a much more compressed vocal sound, I’ll usually go to the UAD 1176 Blue Face. This is not the subtle part of the chain. I’ll often use a fast attack, a slower release, and then drive the input until I get the sound I’m looking for.
This can give the vocal a more aggressive, energetic and upfront feel. To me, it can work really well for a late 90s rock or pop-rock style vocal, where the vocal needs to be very controlled and pushed forward. Sometimes I’ll pair this with extra saturation if I want the vocal to feel dirtier or more intense.
Reverb and Delay
Most of the time, I use reverbs on sends rather than directly on the vocal channel. Occasionally, if it’s a particularly airy or intimate vocal, I might add a tiny amount of reverb directly on the vocal chain. This would normally be something long, floaty and spacious. The idea isn’t to make the vocal sound obviously wet, but to give it a slight sense of air before it reaches the main reverb and delay sends.
After the main vocal processing, I’ll send the vocal to my main reverbs. These are usually reverbs that already exist through the rest of the session. This helps the vocal feel like it belongs in the same world as the track. I normally have a few different reverb buses set up, such as a Large Hall, Plate and a Chamber. Valhalla VintageVerb is one of my go-to plugins for this. The Hall can give the vocal size, a Plate can give it brightness and density, and a Chamber can add a more natural sense of space. I’ll blend these depending on the song.
The important thing is that the reverb supports the emotion of the vocal rather than washing it out.

For delays, I often use Waves H-Delay on separate buses. I’ll typically have a few different delay options ready to go: an eighth-note delay, a dotted eighth-note delay and a quarter-note delay. The eighth-note delay can add movement without being too obvious. The dotted eighth can create a more rhythmic, wider feel. The quarter-note delay can be useful for bigger throws or more open sections.
Final Thoughts
Everything in this chain changes from project to project. The plugin order might change, some stages might be removed completely, and some songs will need far less processing than others.
The most important thing is listening to the song and understanding what the artist wants. A vocal chain shouldn’t just be about making something sound technically polished. It should help the performance communicate the emotion of the track. My vocal chain usually starts long before the first plugin. Cleaning the audio, removing distractions, balancing each section and controlling the vocal before compression are all just as important as the plugins themselves.
From there, I’ll usually use Logic Pro Channel EQ for clean-up and tone shaping, FabFilter Pro-Q for dynamic problem-solving, UAD Spark plugins like the Neve 1073, SSL G Bus Compressor, LA-2A and 1176 for character and control, and then Valhalla VintageVerb and H-Delay for space.
It’s not about using the most plugins. It’s about making small, intentional decisions that help the vocal sit in the track and connect with the listener.
If you’re working on a song and struggling to get the vocal to sit right, the answer might not be more compression or more plugins. It might be careful editing, better balance, and a clearer idea of what the vocal is supposed to feel like.
Need help getting your vocals or mix sounding finished?
I offer remote mixing, vocal production and production support using the same workflow discussed here.
Get in touch to discuss your next project.


Comments